Install and Set Up MySQL on Windows, Mac OS, and Ubuntu
Video Tutorial
Overview
MySQL is a popular database management system in today's industry. It is one of the most widely used open-source relational database management systems, and it can run on almost any OS, including Microsoft Windows, Linux, UNIX, and Mac OS. It includes multi-user access to multiple storage engines and is supported by Oracle.
When installing MySQL, there are three primary aspects to keep in mind:
- The underlying Operating System
- What tools should I use to install MySQL?
- Installing certain features.
Scope
- In this article, we will learn how to install MySQL on Windows, Mac, and Ubuntu.
- You will also learn how to add MySQL to PATH Environment Variable in Windows and how to launch MySQL after successful installation.
- Most of the time, when we try to install MySQL, we encounter a slew of issues and failures in the installation process. However, with the assistance of this tutorial, you will be able to install MySQL on your PC correctly.
How to install MySQL
MySQL is a popular relational database management software managed by Oracle. It is widely utilized in businesses today, supporting multi-user access with various storage engines.
Prerequisites:
To work with MySQL, your system must meet the following requirements:
Hardware Requirements:
| Hardware | Requirements |
|---|---|
| CPU | Xeon 3GHz ( or Dual Core 2GHz) or Intel Core or equal AMD CPU |
| RAM | 4 GB RAM (6 GB recommended) |
| Display | The minimum display resolution is 1024 x 768 pixels (1920 x 1200 or higher recommended) |
| Cores | Single (Dual or Quad-Core is recommended) |
Software Requirements:
| Software | Requirements |
|---|---|
| Operating system | Windows 7 or higher versions, MAC OS X 10.6.1+, Ubuntu 9.10(64 bit), Ubuntu 8.04(32bit/64bit) |
| General | MySQL Configuration Software, Microsoft Framework 4.5.2, Microsoft Visual C++ Redistributable for Visual Studio 2019 |
MySQL Installation on Windows
Step 1: Navigate to MySQL official website and download the community server edition software. Select the operating system which is installed on your host machine, such as Windows, here.

Step 2: There are two alternatives for downloading the setup:
- Select the desired version number for the MySQL community server.
- Choose the MySQL-installer-web-community if you have strong internet connectivity. Otherwise, go with the offline option.
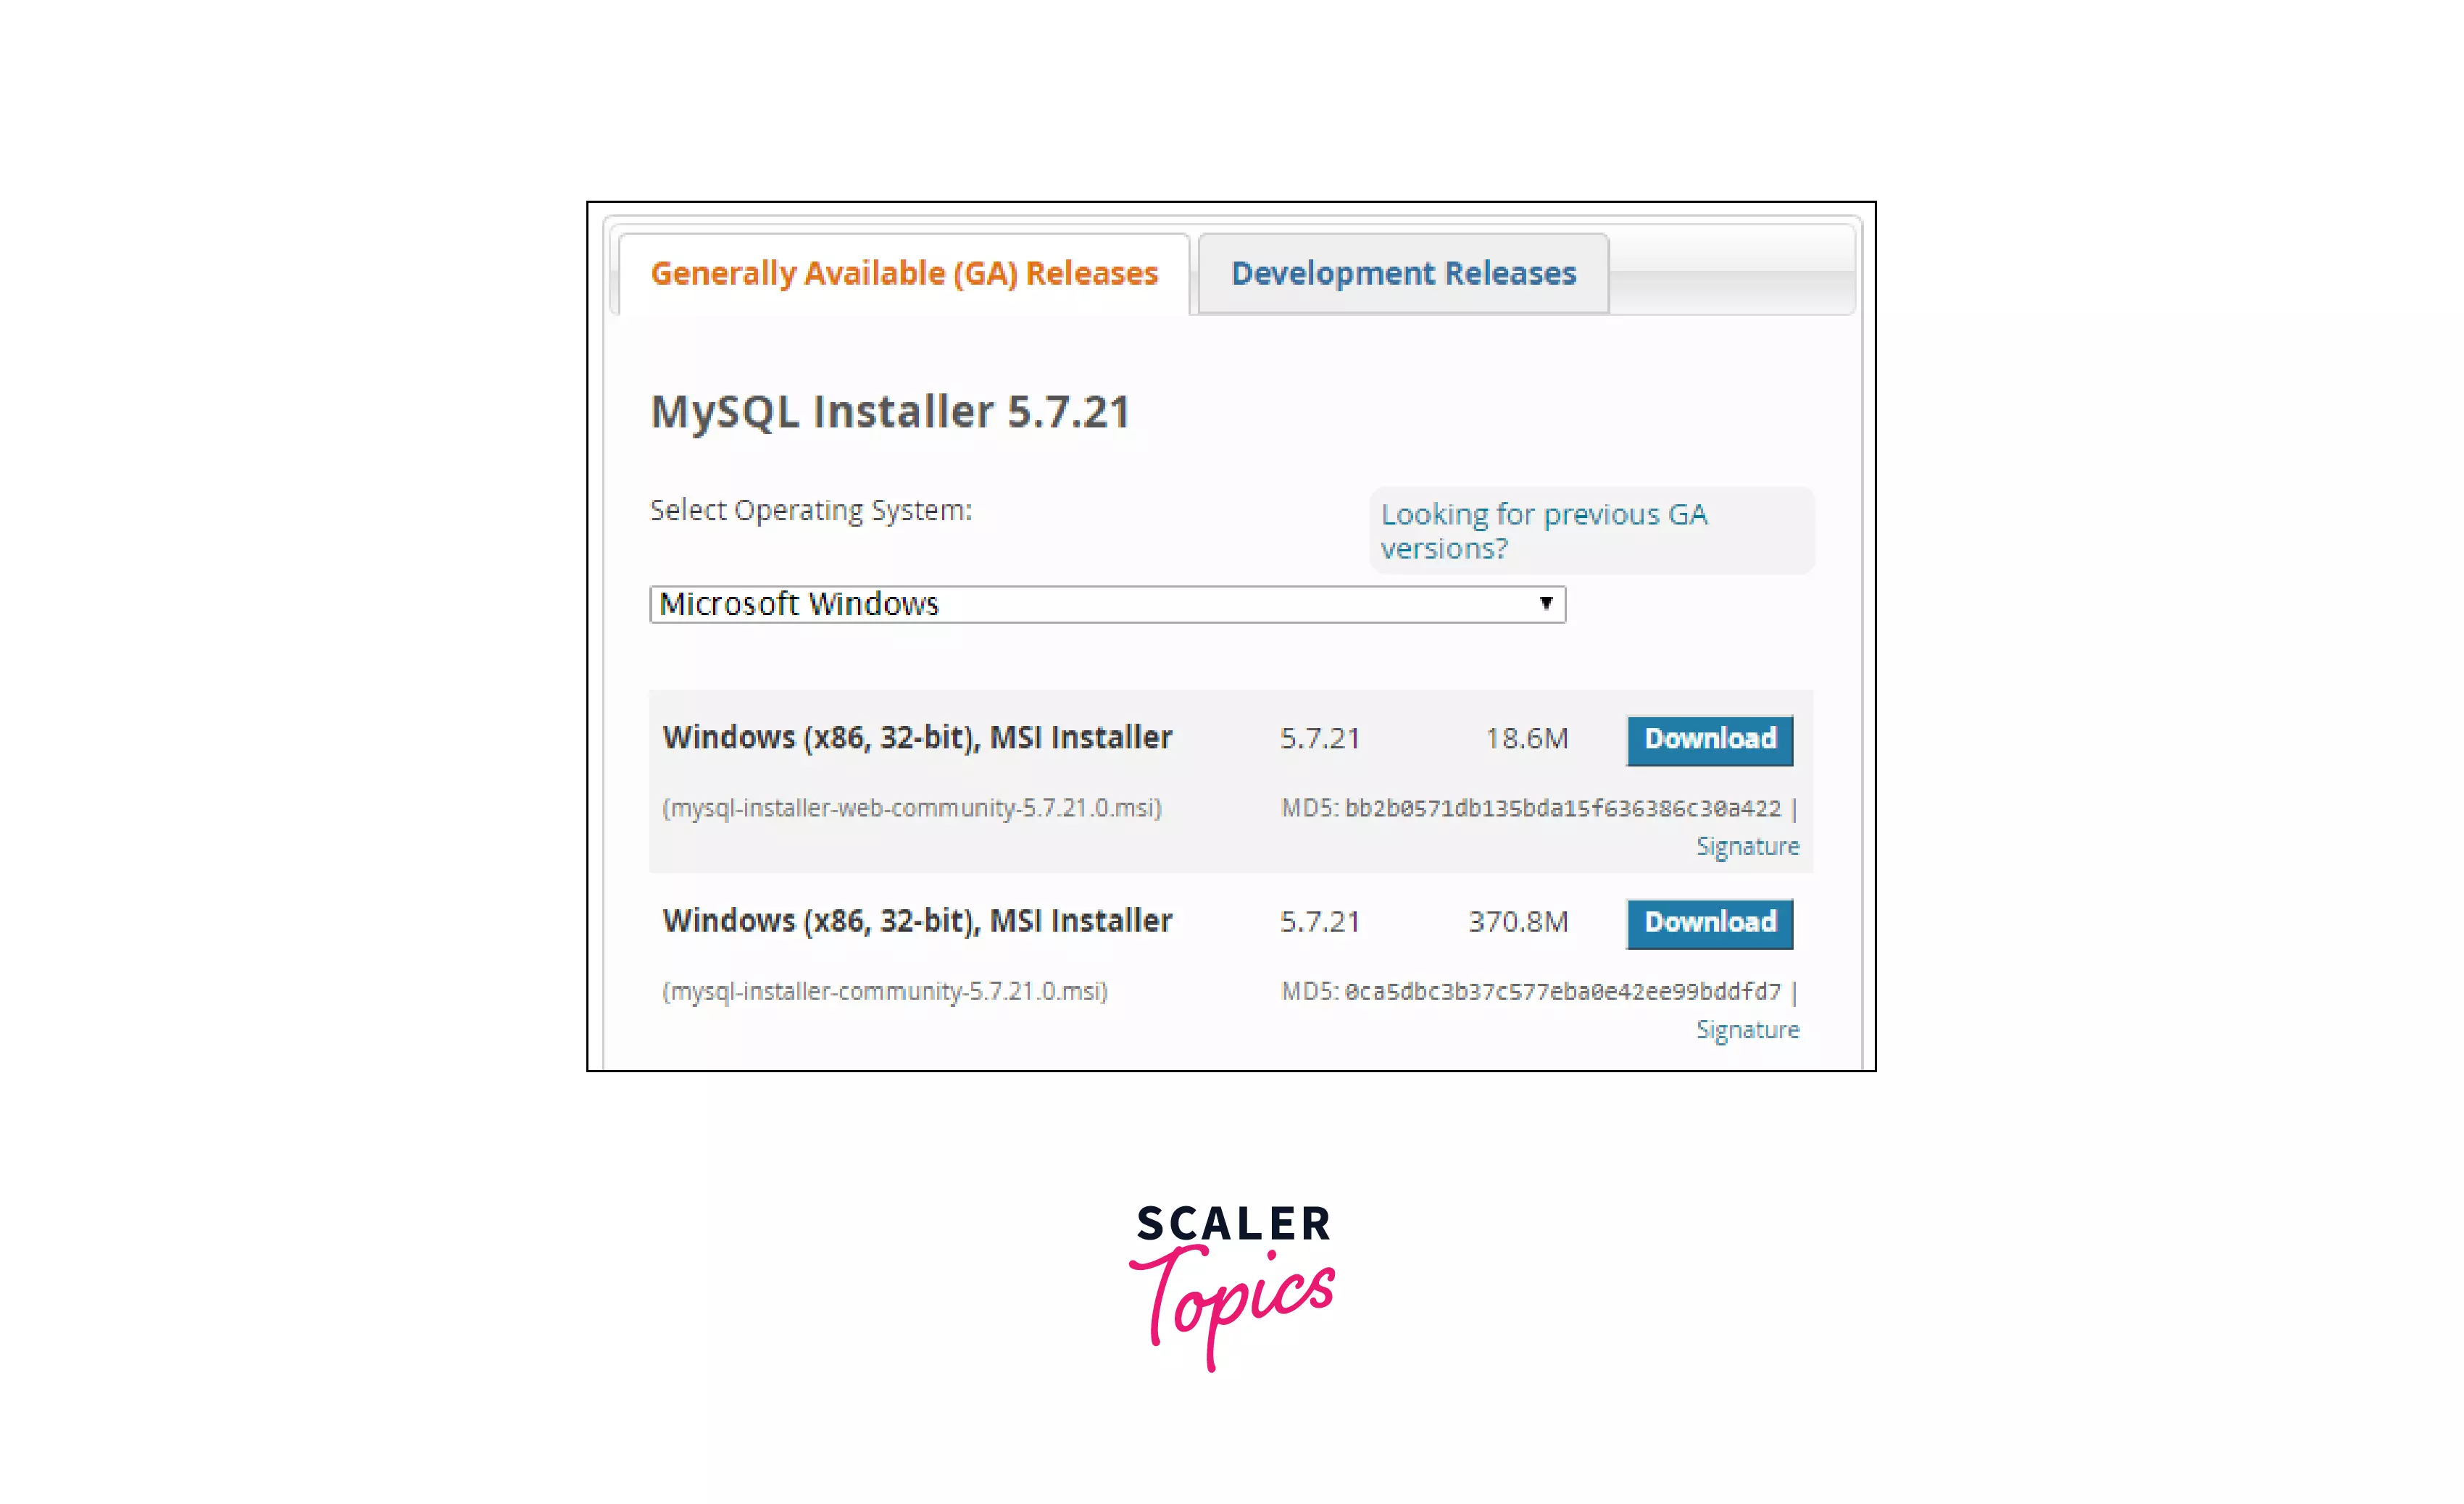
Step 3: After downloading the setup, unzip it to a convenient location and double-click the MSI installer.exe file. The following screen will appear:

Step 4: Read and Accept the Licence Agreement to continue further.

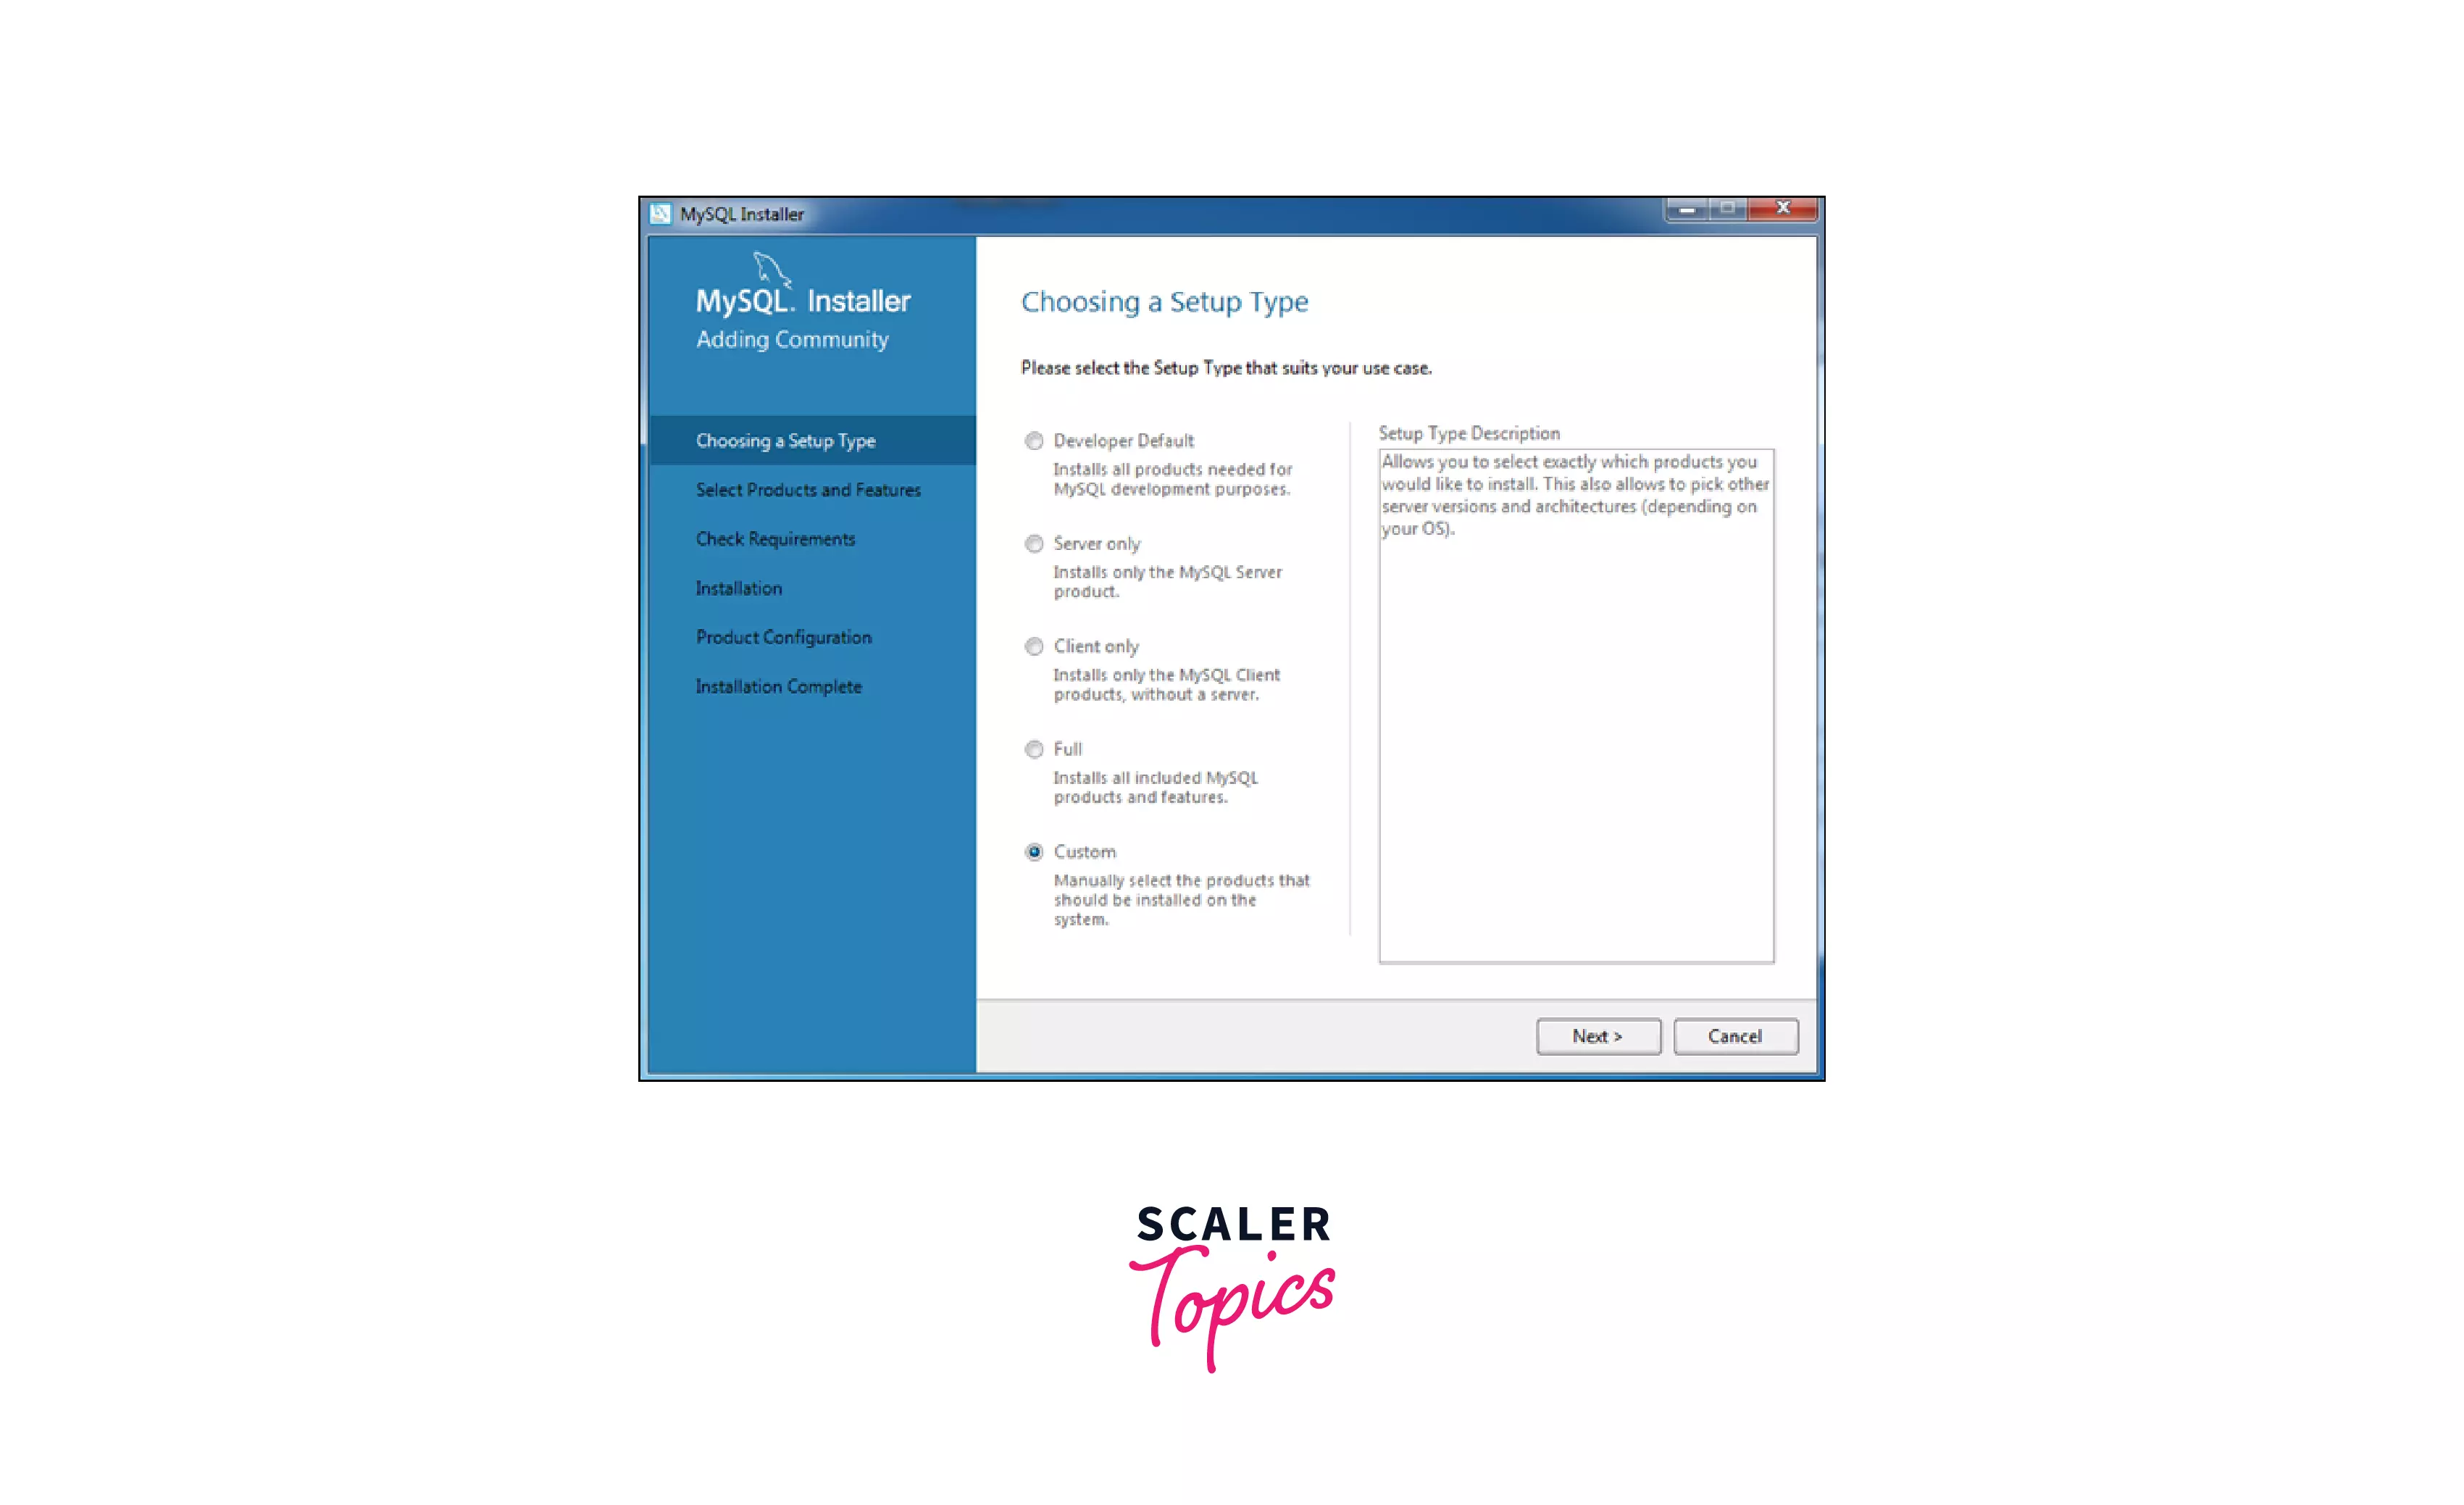
Step 5: Choose a Setup Type.
The default installation includes numerous more items, such as MySQL workbench, connectors, plugins, documentation, sample databases, etc. It will take some time and extra space to install all of these packages.
Note: Worst of all, you won't even use half of these packages. As a result, it's best to utilize Custom Installation and install the components you need. Don't worry, you can always reinstall these packages by rerunning the installer.
Step 6: Choose on a product and its features.
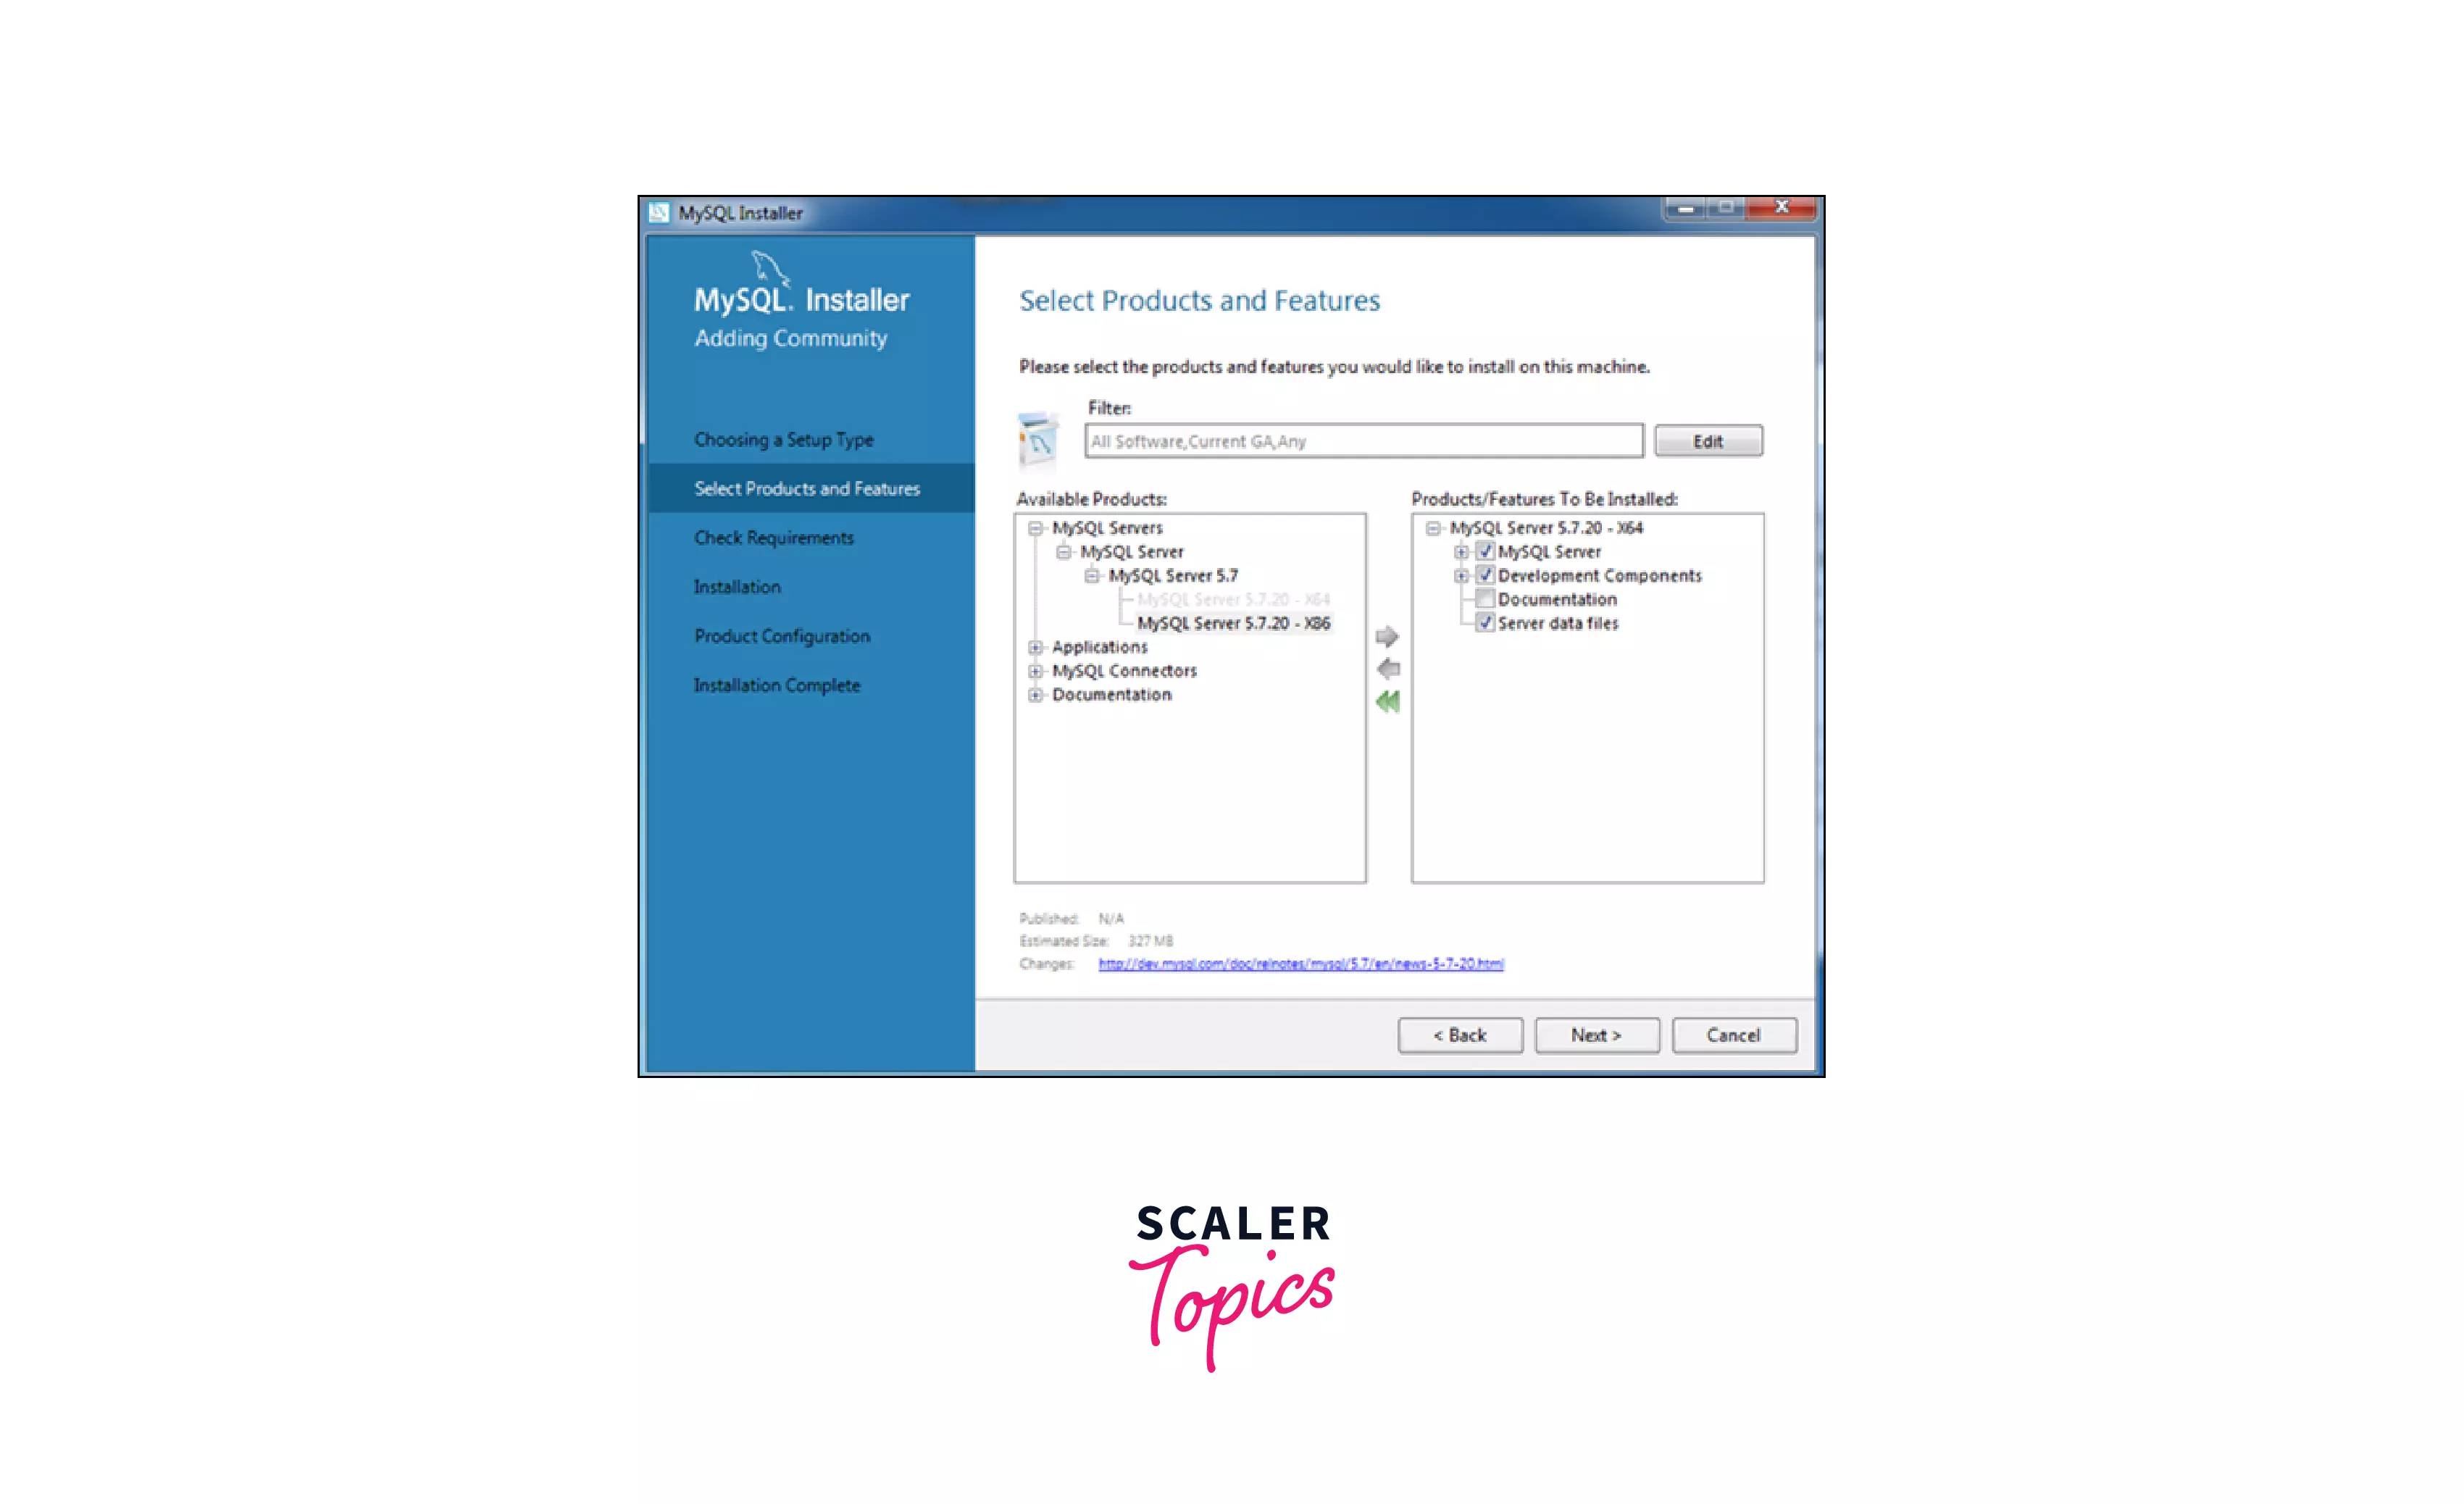
In this case, we only want to install the MySQL server. Select the architecture (x86 or x64) corresponding to your operating system and click Next.
Step 7: Review the Requirements.
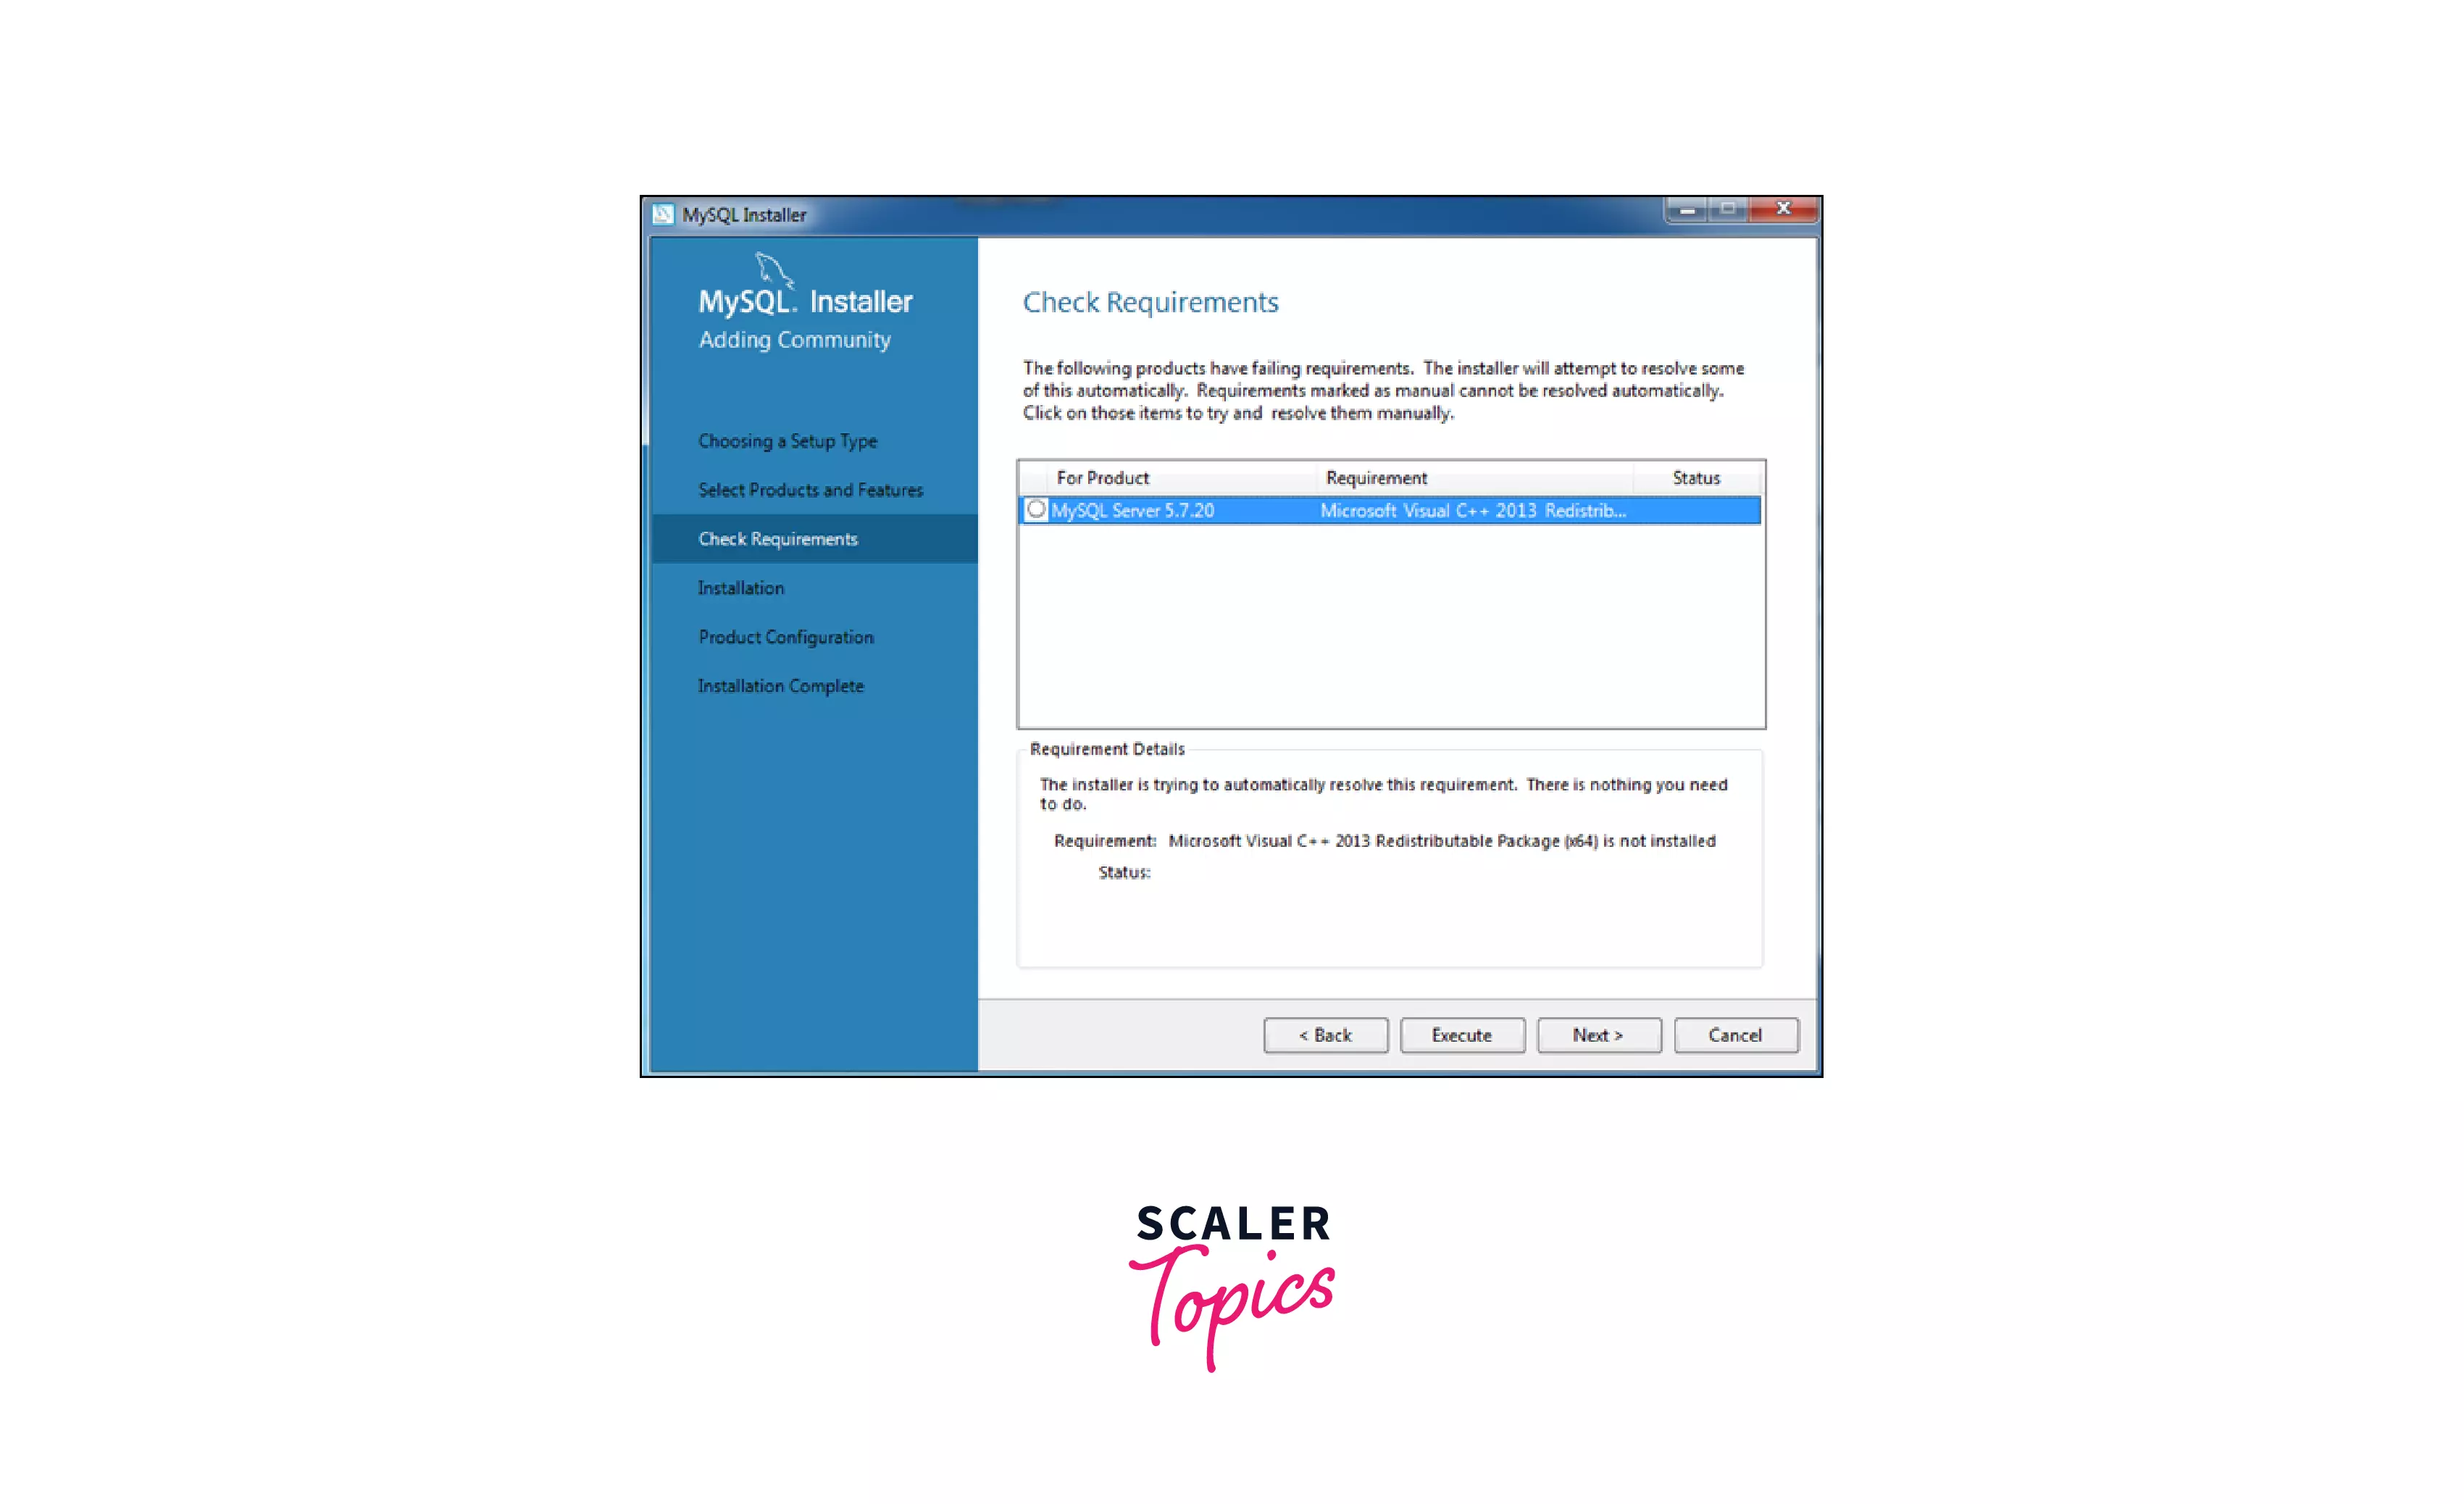
The installer will download the missing dependencies at this point. The below popup will appear only if your system is missing dependencies. To begin the process, click the Execute button.
As you can see, installers on this system require Microsoft Visual C++ Redistributable Package before proceeding. When you click the Next button, the installer will urge you to install the required package.

A green checkmark will appear before the product name when you have installed all of the dependencies.
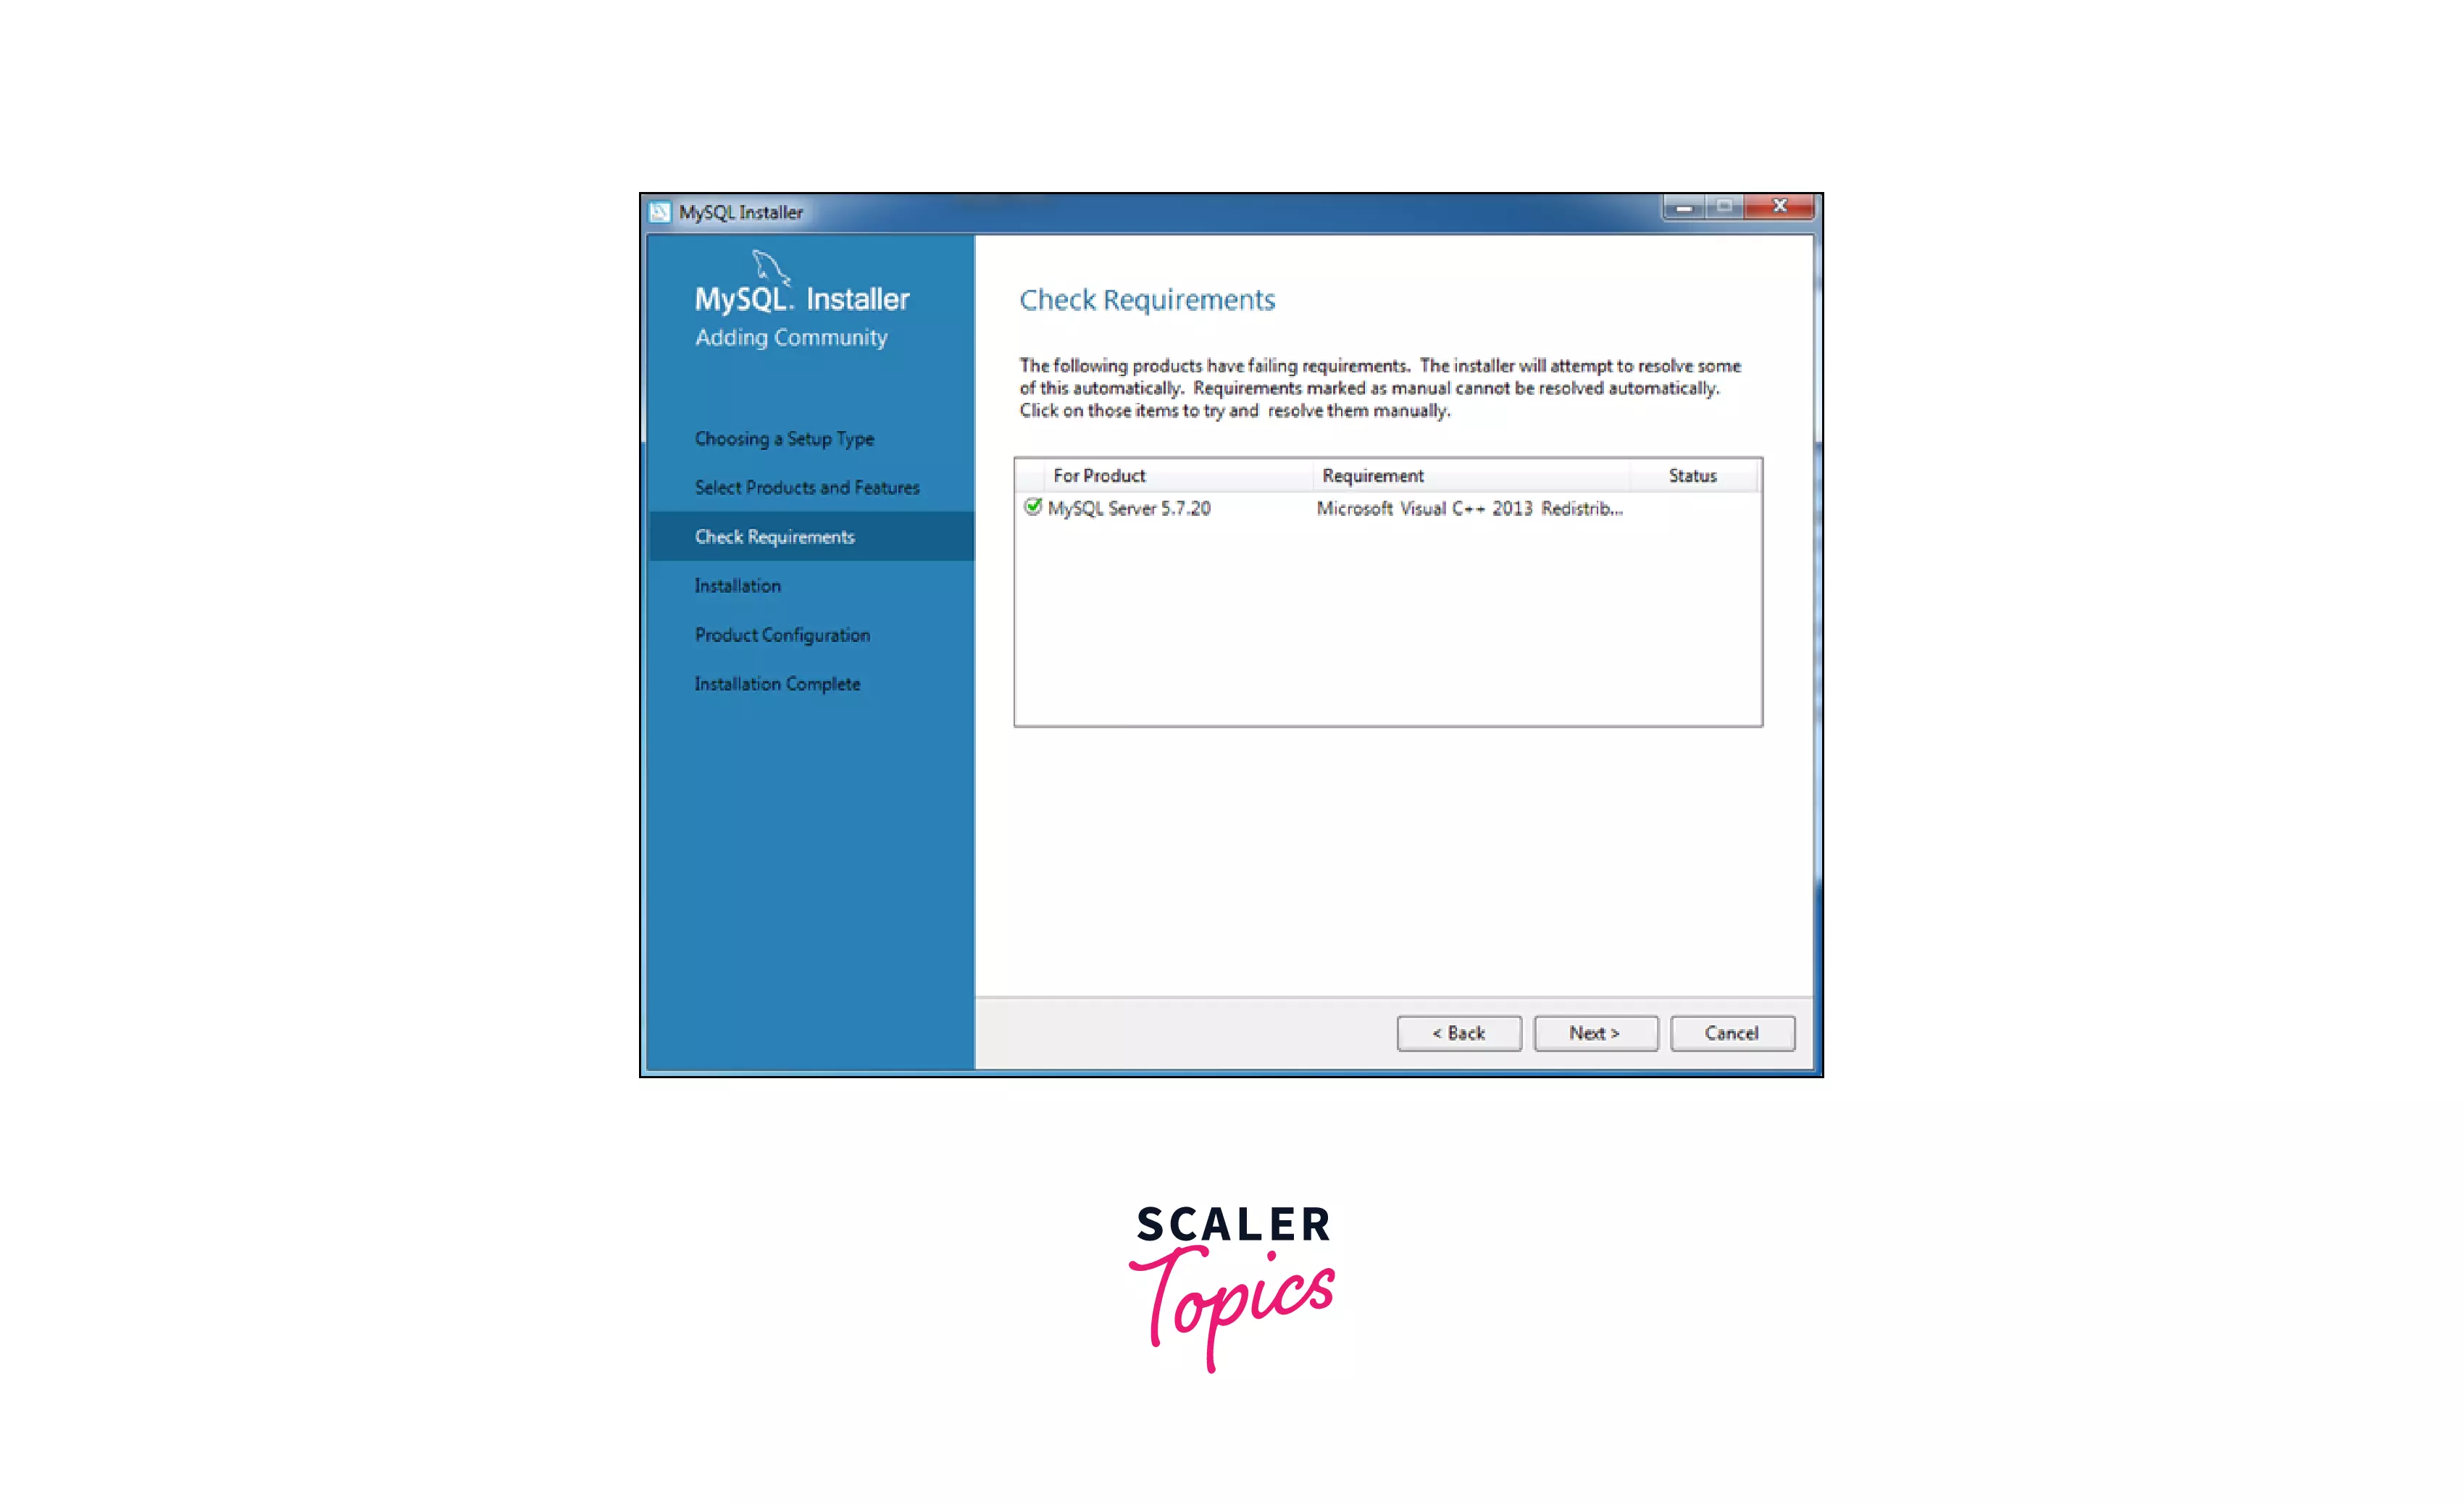
To proceed, click Next.
Step 8: Product Configuration.

Now, the installer will configure MySQL Server. The default selections are fine, so click Next on each subsequent screen. Following that, you will be requested to enter your login and password. Set your own username and password. You will use this to access the MySQL server.
You've made it through the most difficult stage of the installation process. Accept the defaults on the following windows by clicking Next. Finally, click the Finish button to exit the installer.
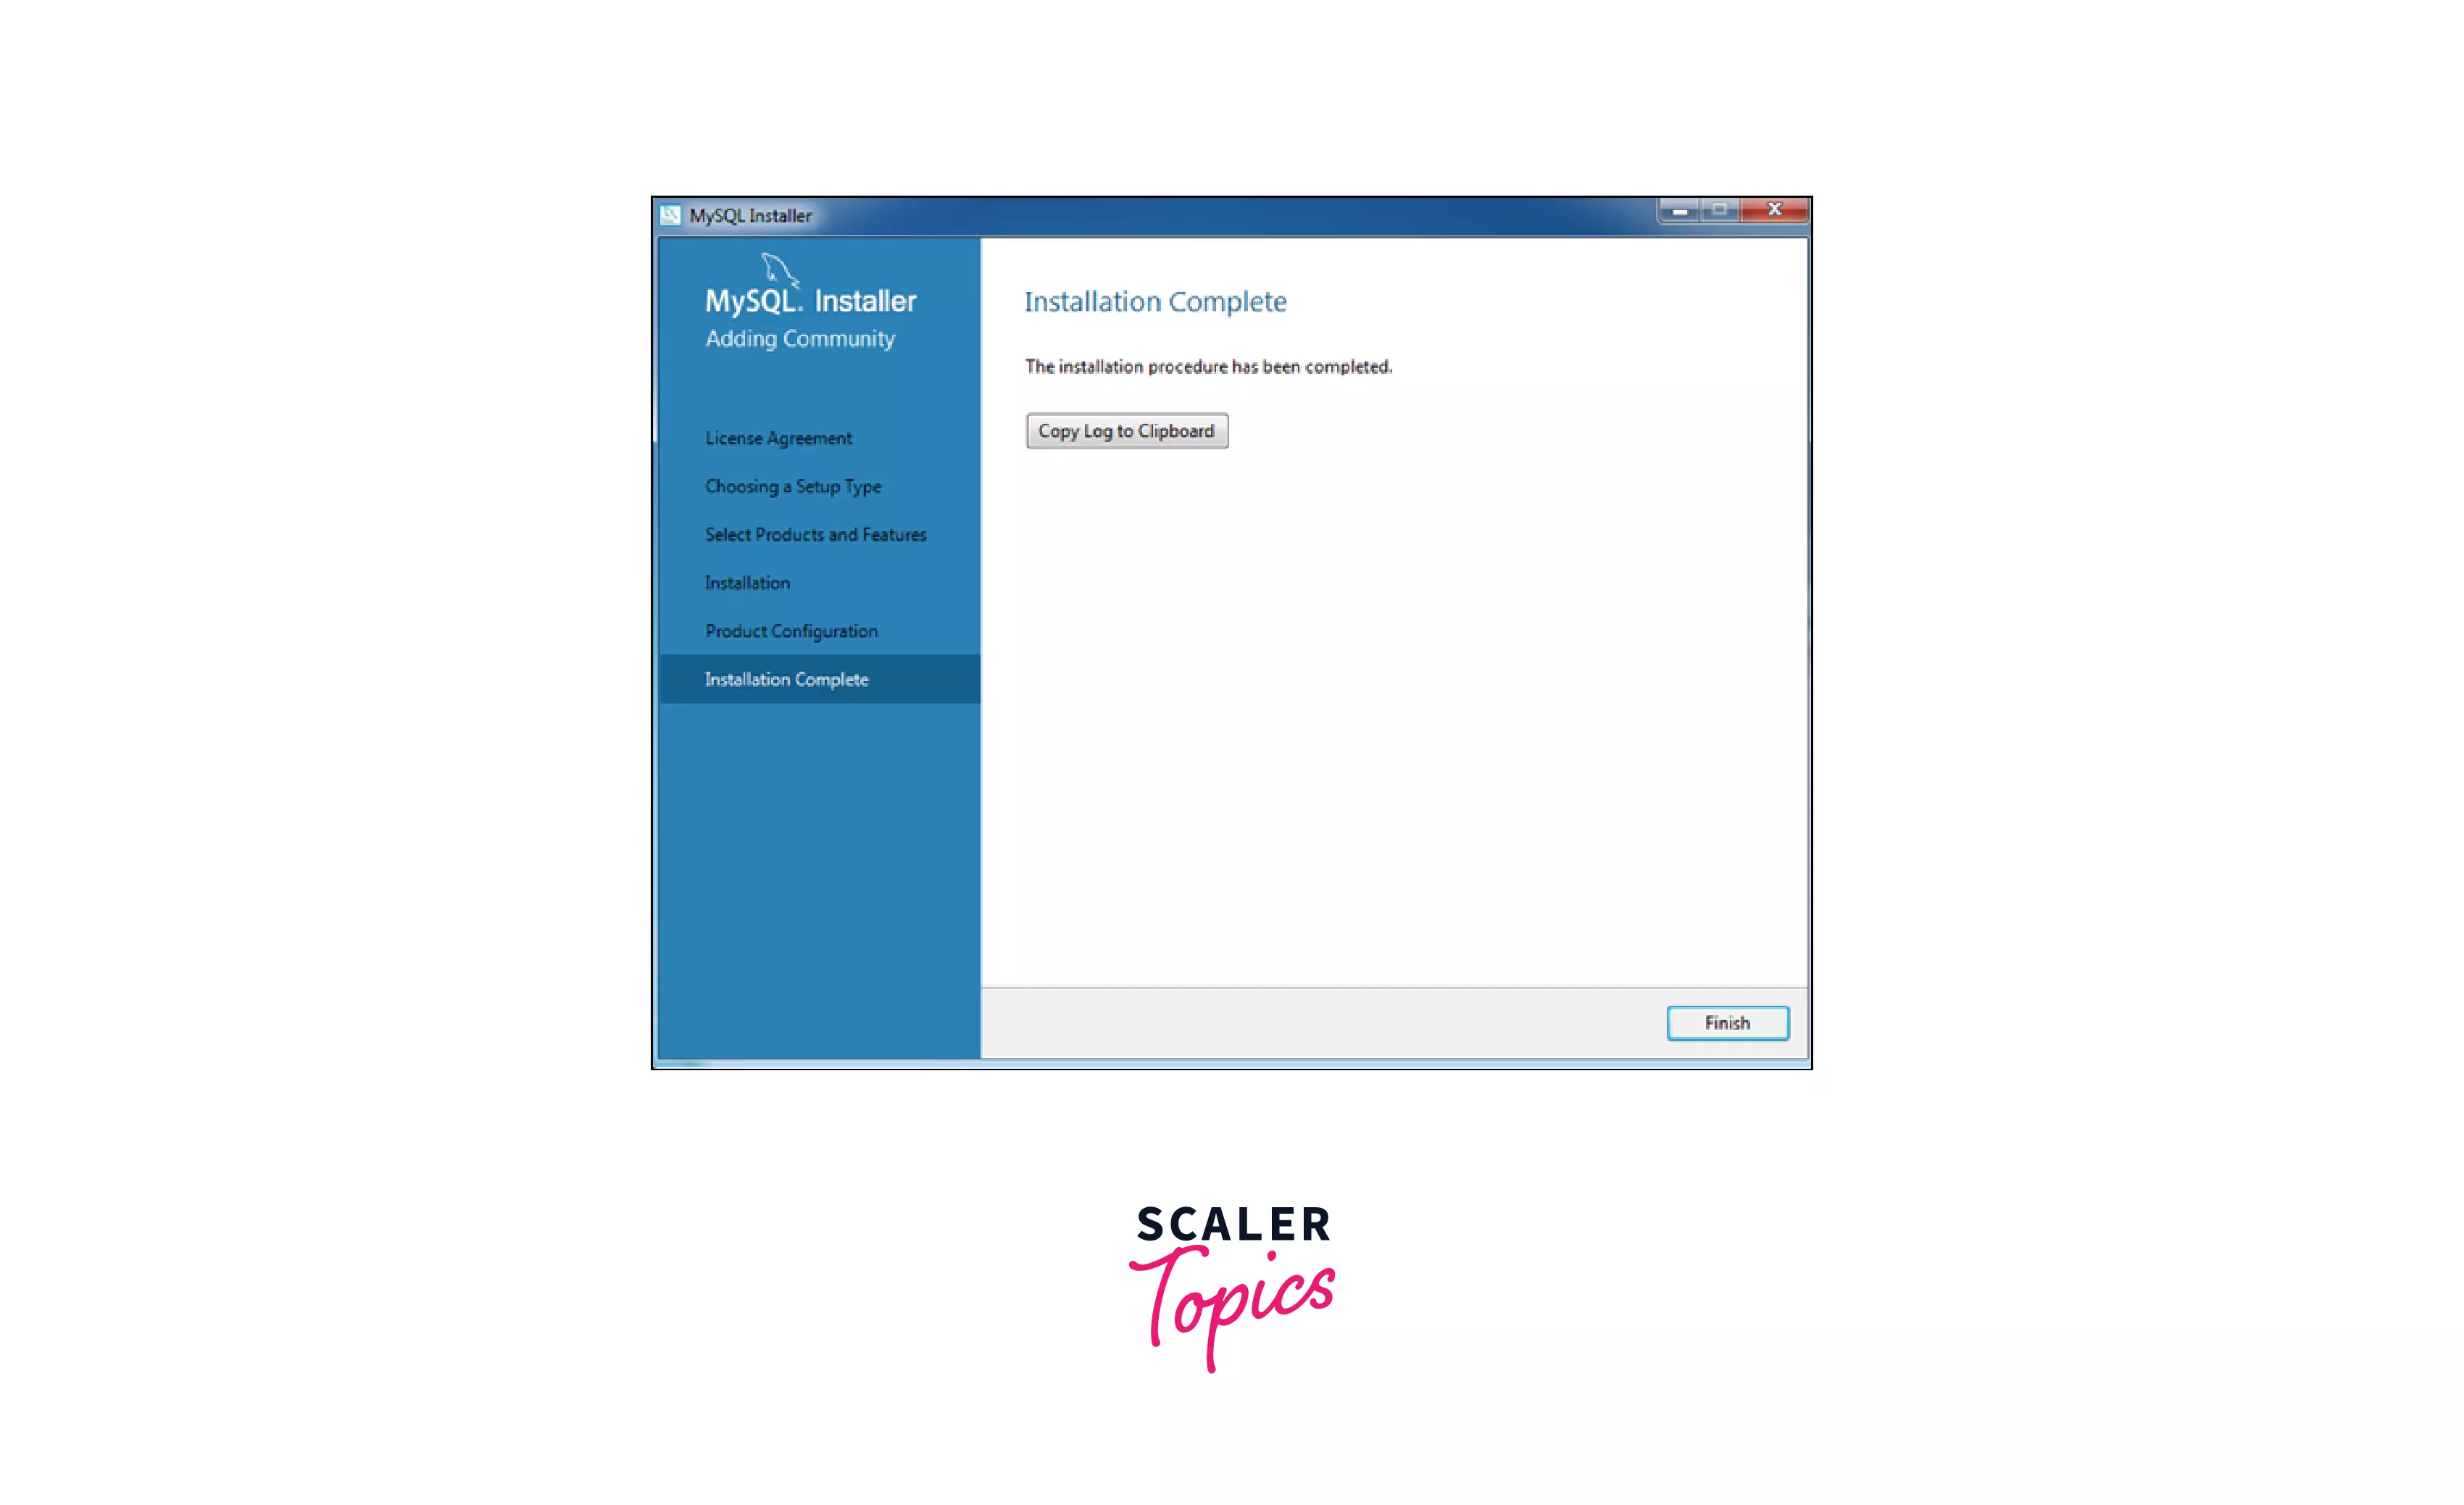
Adding MySQL to PATH Environment Variable in Windows
To add MySQL to Windows Environment Variables, you must alter the command processor's current invocation or set it to permanently affect future invocations. A variable can be set permanently in a startup file or with the help of the system's interface for the same purpose.
To define a value for an environment variable, use the command processor's proper syntax (rules that must be followed in order for a piece of software to interpret the command).
The command to set environment variables can be executed at the command prompt, and the settings will take effect instantly, but they will only last as long as the user is logged in. The changes are gone once they log out.
Suppose the MySQL applications are installed in /usr/local/mysql/bin, and the user wants to make it easier to access them. In that case, the PATH environment variable can be configured to include that directory.
Before adding MySQL to the Windows path, confirm that MySQL has been correctly installed.
The steps to add MySQL to the PATH environment variable are as follows:
Step 1: Navigate to the mysql.exe file. We discovered it in the following directory:
Step 2: Press the Start button and type Environment Variables
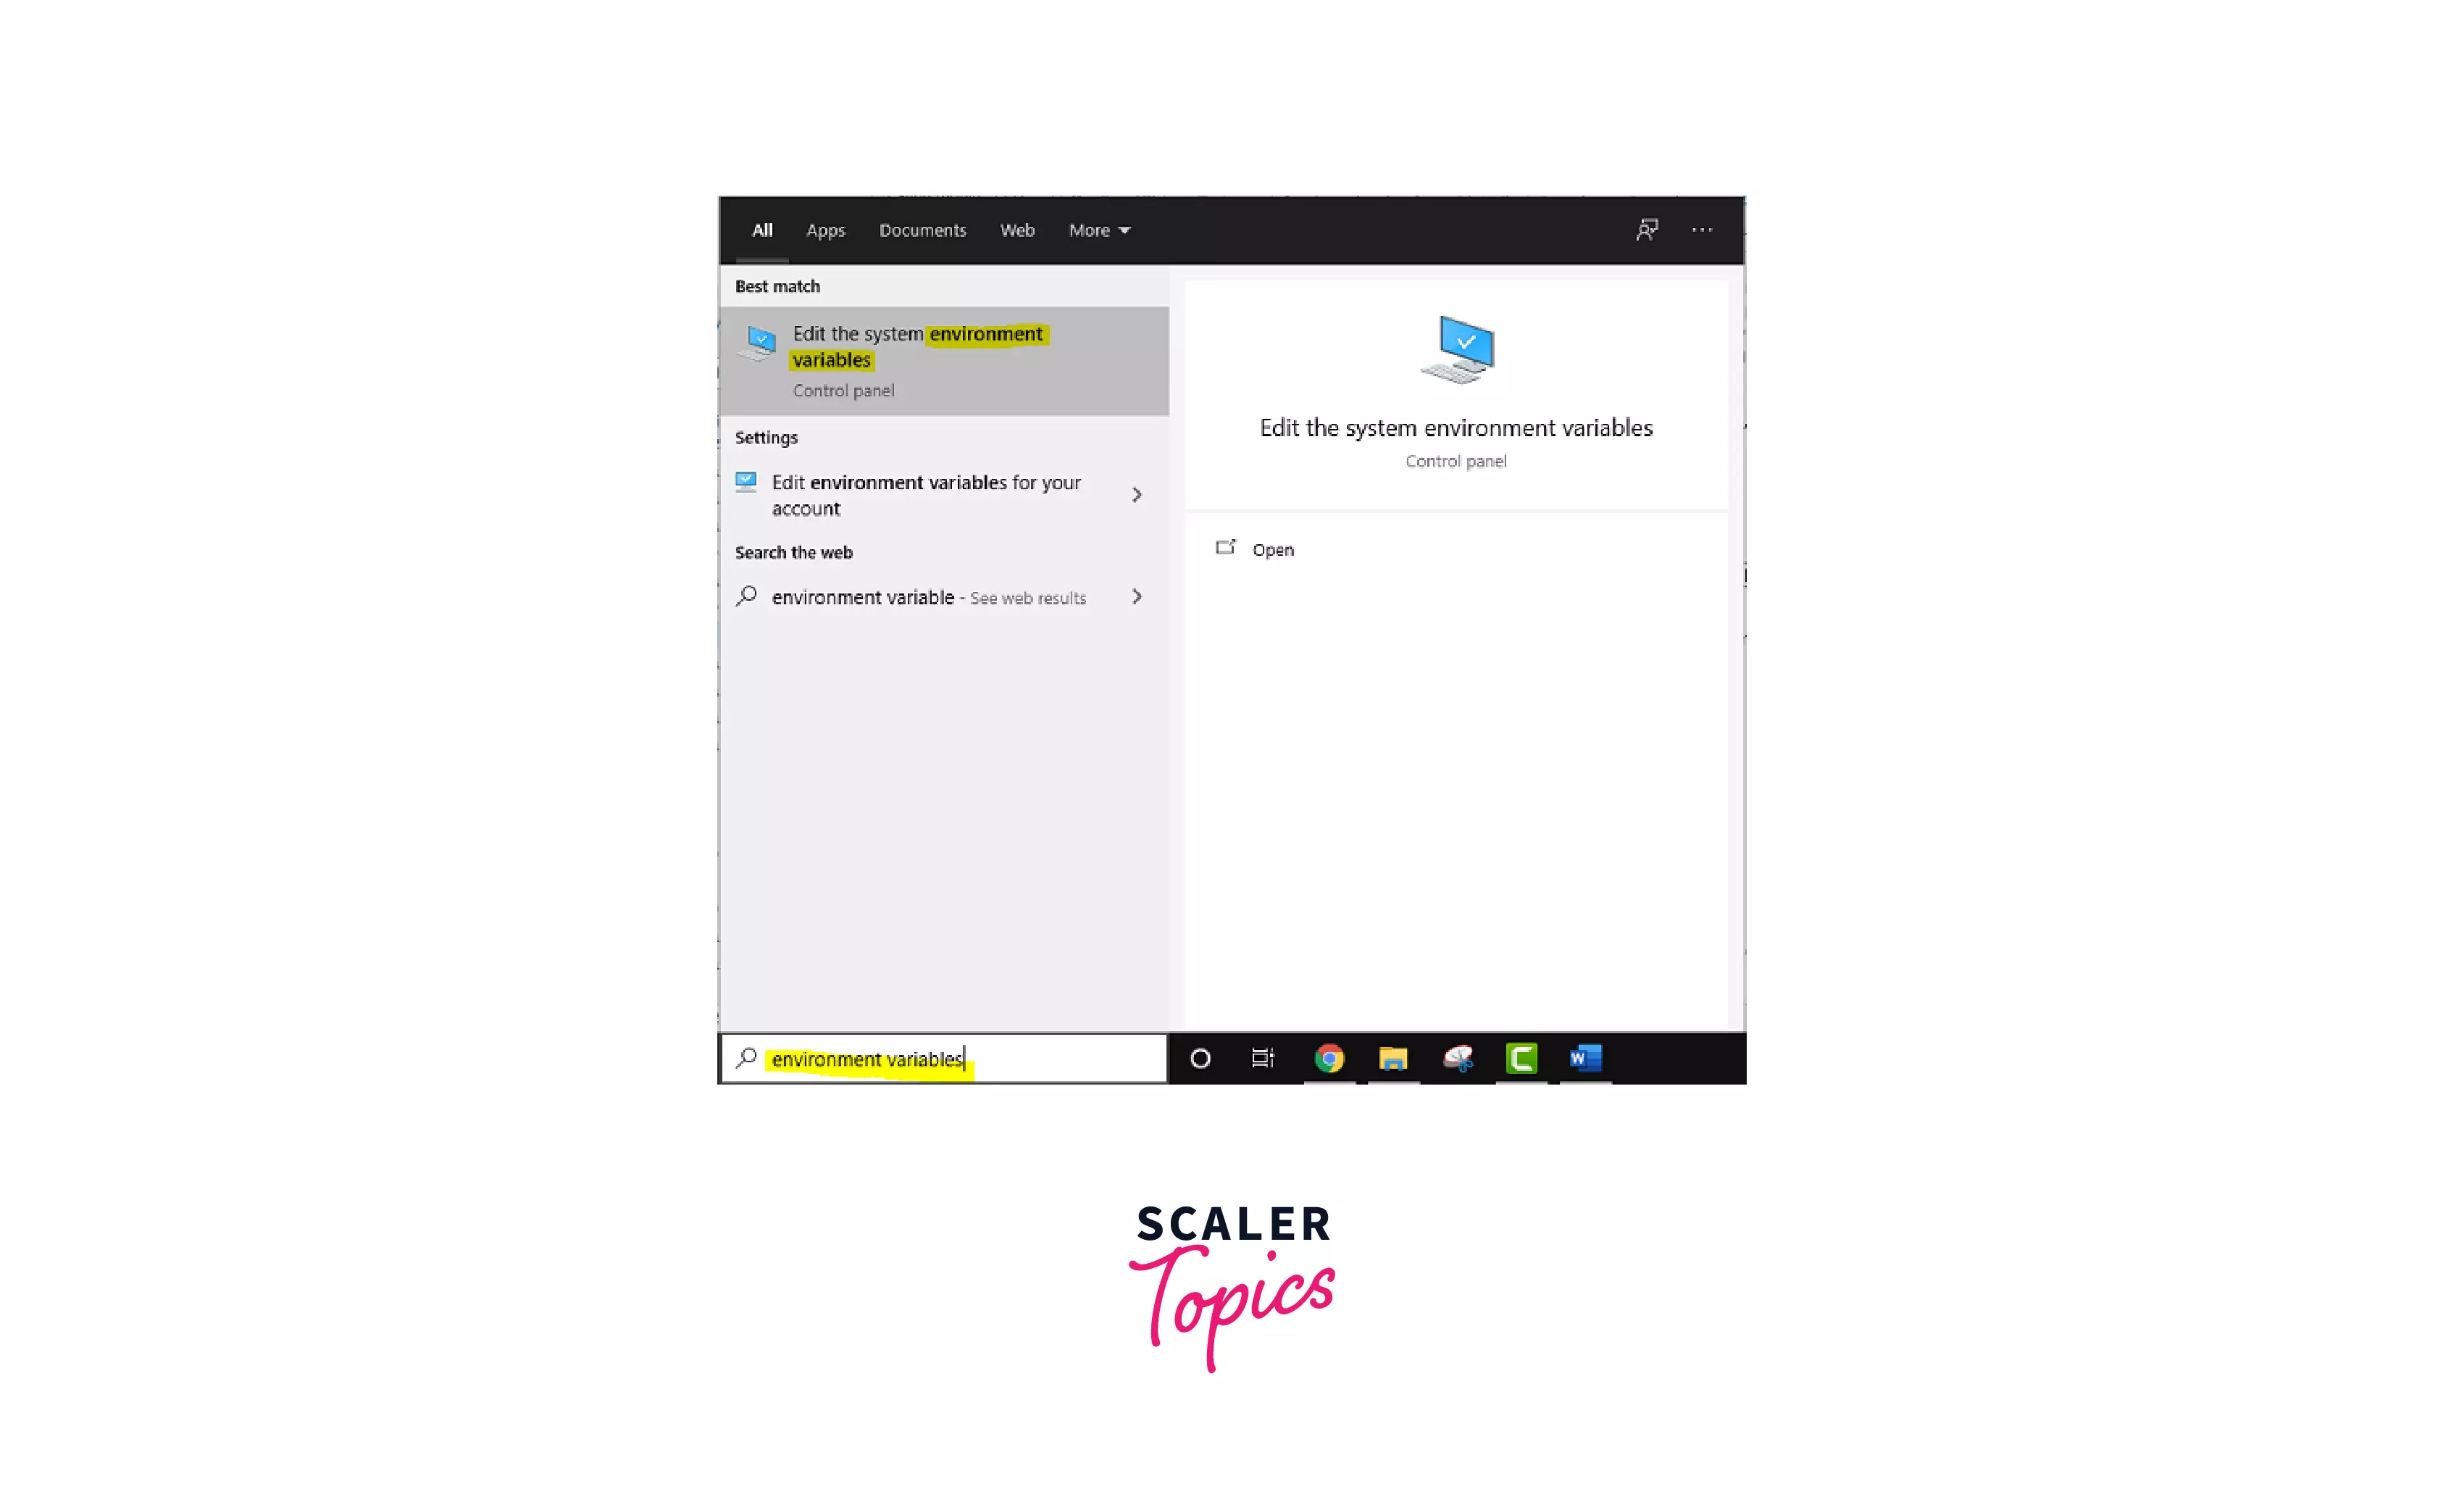
Step 3: Select Advanced system options from the control panel home.

Step 4: Select Environment Variables at the bottom of the newly-created window.

Step 5: Select the Path environment variable and press the Edit button in the new window.

Step 6: Add (;) at the end of the current variable value
(The actual may vary based on the application's version and architecture). To save, click OK.

Step7: Launch the Command Prompt and type the following command:
Seeing the MySQL version in the output implies that everything is fine and you have successfully installed MySQL Server. To connect with the MySQL server, run the following command:
You will then be asked for a password. On success, you will get the following output:
Tip: To exit MySQL shell, hit \q.
MySQL Installation on Ubuntu
To get MySQL for Ubuntu Linux, go here and grab the DMG archive. Launch a terminal on your Ubuntu machine.
Follow the instructions below to install MySQL on your Ubuntu server:
Step 1: To begin, update the apt package index by entering:
Step 2: Type the following command to install MySQL on a Debian-based system such as Ubuntu or Mint:
The installer will automatically add the MySQL executable path to the PATH environment variable.
Launching MySQL after Installation on Ubuntu
To check the installation, type the following command:
If you see the version of MySQL, it signifies you've successfully installed the MySQL server.
The MySQL service will be started immediately after the installation process is complete. To see if the MySQL server is up and functioning, enter:

You can terminate the server by issuing the following command:
To restart the server, run the following command:
A utility like mysqladmin can also be used. Use the MySQL server administration command-line utility to check the status of the MySQL server.
Use the following command:
If the MySQL server is up and functioning, you should see something like this:
MySQL Installation on Mac OS
To get MySQL for Mac OS, go here and grab the DMG archive.

Step 1: Download DMG Archive of Mac OS X 10.13 (x86, 64-bit). Then you get this pathetic screen:

MySQL is free and open-source software (FOSS), there is no need for you to sign up or create an account. Click on No thanks, just start my download. Because the file is 350mb, it will take some time to download.
Step 2: To begin, double-click the installer and follow the on-screen instructions. After a successful installation, you will be given a temporary password to log in to the MySQL server. Because the temporary password cannot be recovered, create a copy and put it somewhere secure.

The MySQL installer often places the files in the MySQL directory within /usr/local/. MySQL installer for Mac, like Windows, does not add the MySQL executable to the PATH environment variable. As a result, we must run MySQL by supplying the complete path to it in the terminal.
Launching MySQL after installation on Mac OS
Step 1: Open System Preferences and select the MySQL option.

This will launch the MySQL preferences window.
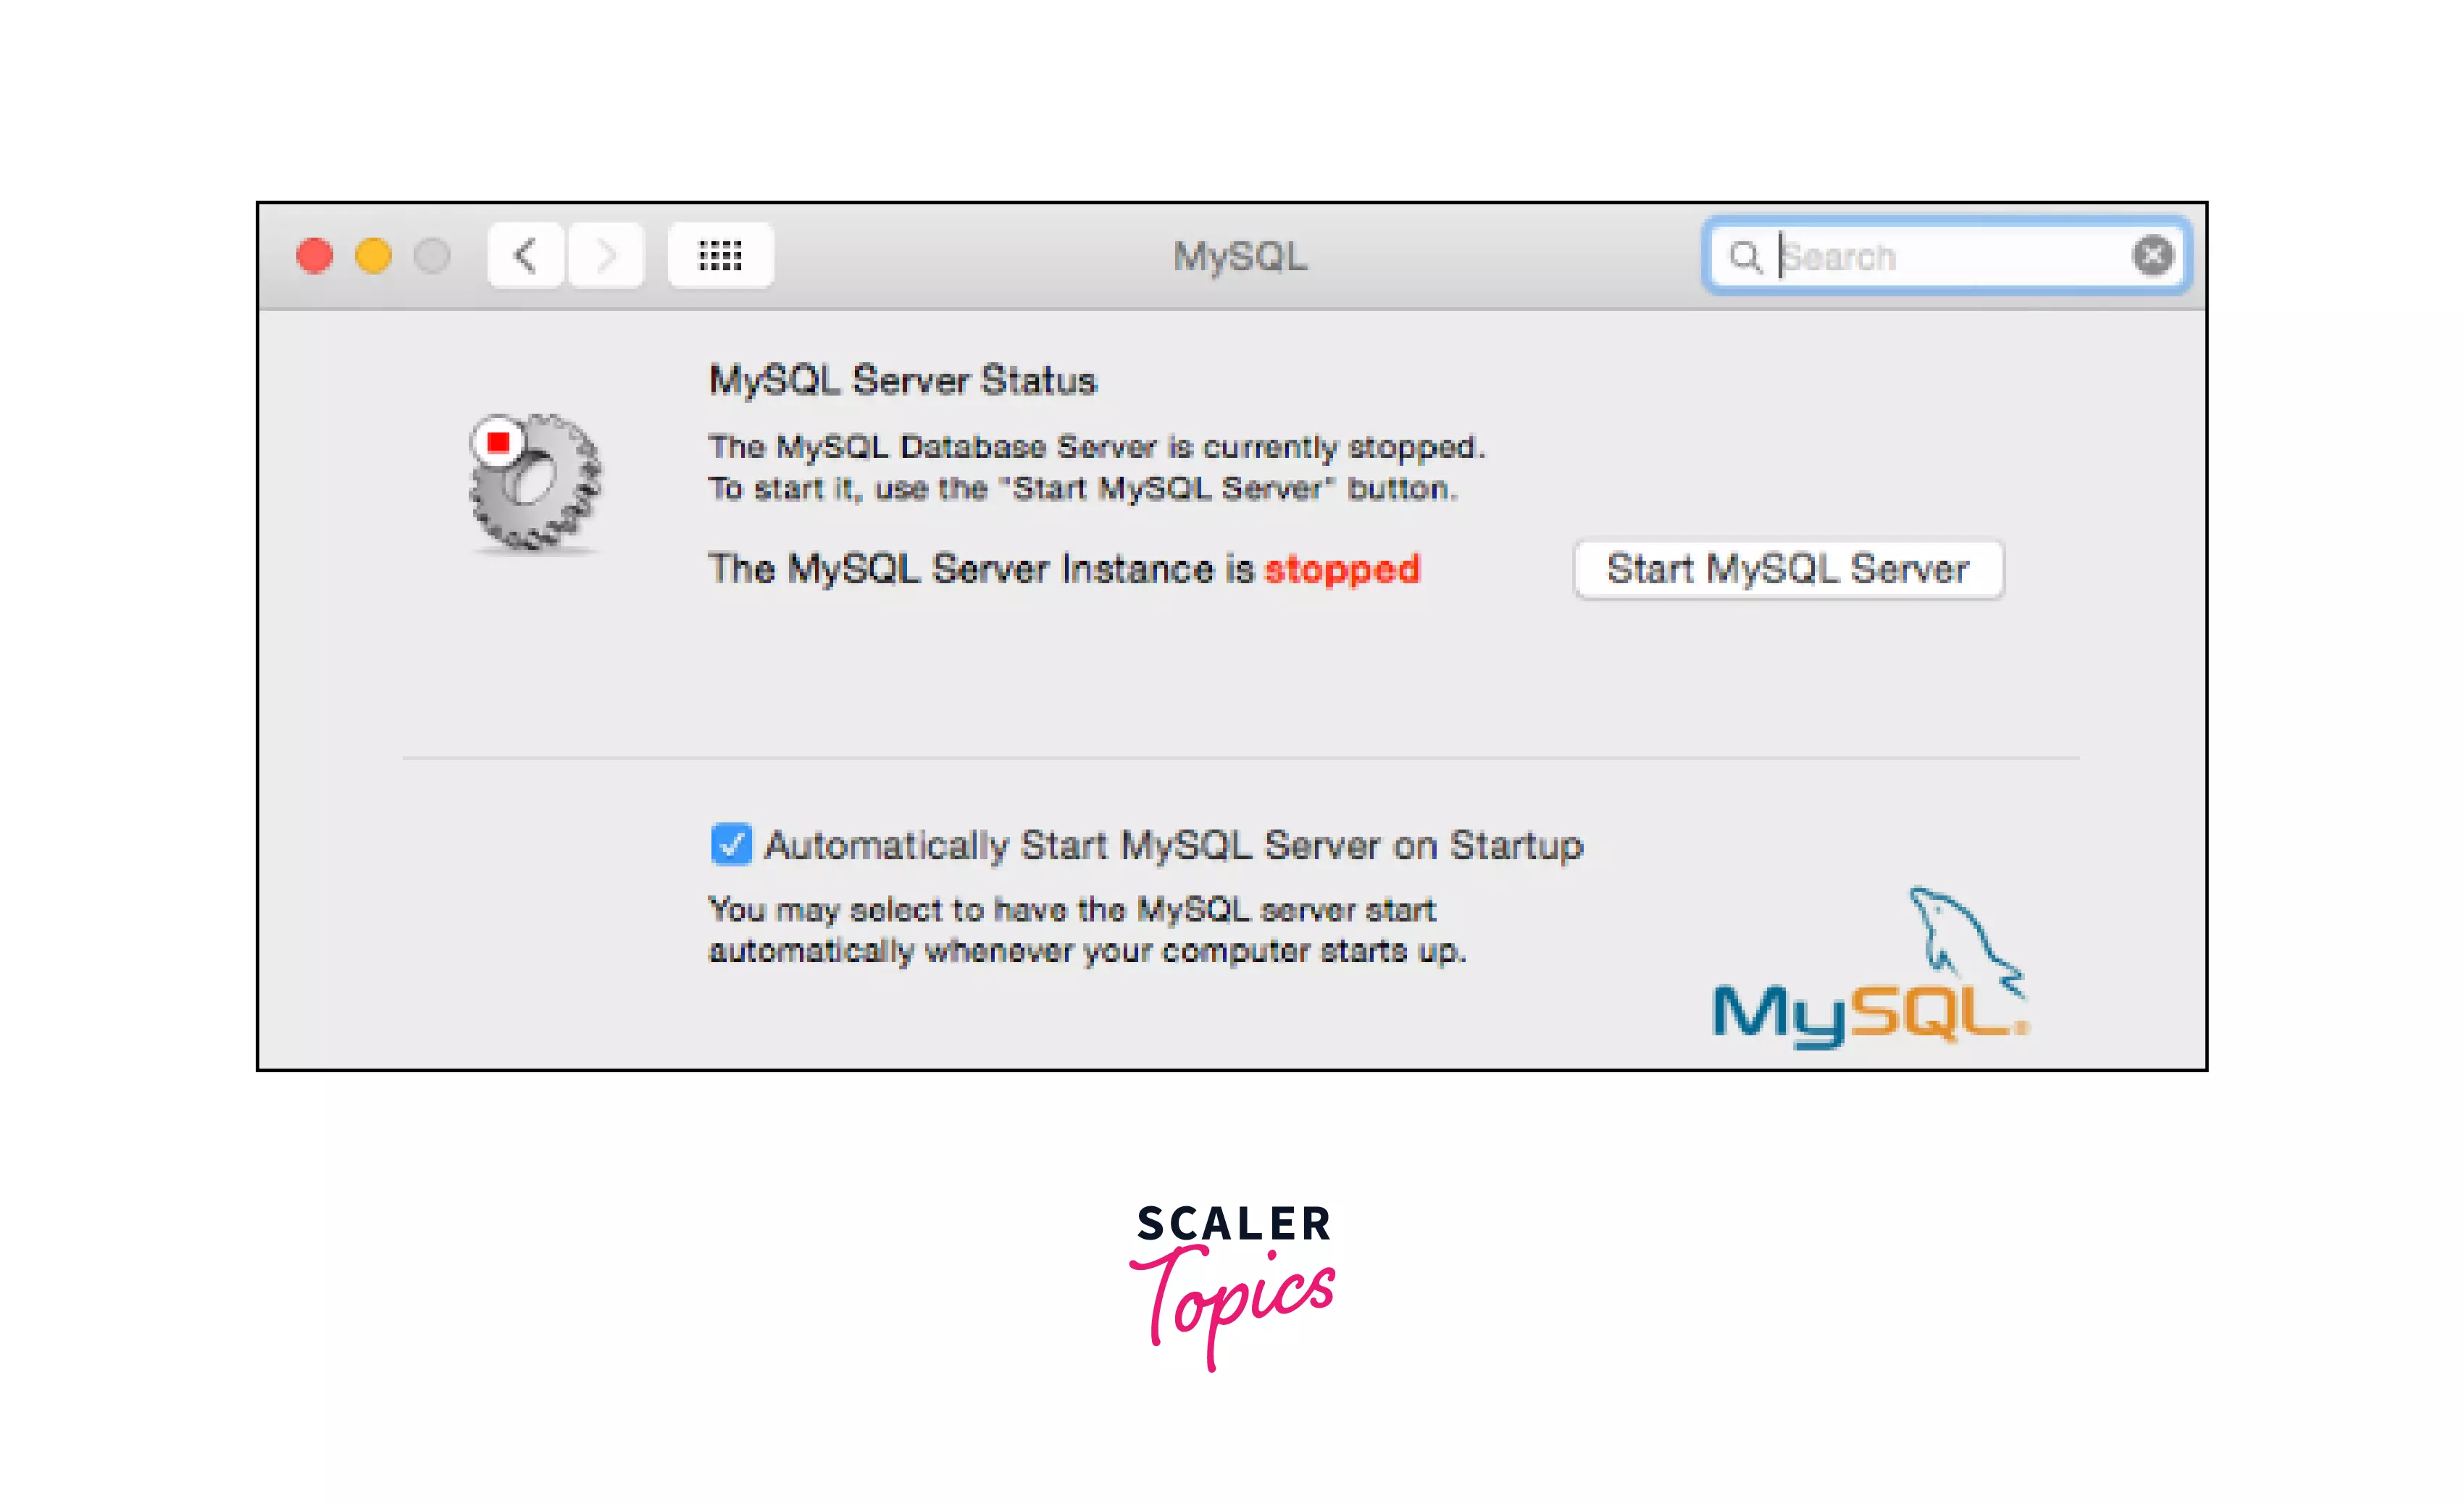
Step 2: As shown on the screen, the MySQL server is now not operational. To start the server, click the Start MySQL Server button.
To connect to the MySQL server, type the following command into the console.
After that, you'll be prompted to provide a password. Enter the temporary password you copied during installation and press Enter.
Note: You may receive an error if you do not include the -p parameter in the preceding command.

While inside the terminal, type the following command to change your password.
Note: Enter the exit command and press the enter key to quit the MySQL command line console. Exit should be in back tick here.
Conclusion
- MySQL is an open-source relational database management system that is user-friendly for developers. MySQL runs the back end of many popular social, streaming, and service websites because it is dependable and easily scalable.
- This tutorial covered how to use MySQL Installer to install MySQL on Windows, Ubuntu, and Mac OS.

